
Winning Pretty:
Keys To the Kick ServePart 2
Chris Lewit
In an ideal world, why not develop a player who can have a great twist serve (with more upper back arch and toss to the left) during clay court tournament segments and, during the fast court season, slightly adjust the toss to provide the benefits of more disguise? Here the player has it both ways. It allows the player to adjust his mechanics depending on the tactical plan. If the opponent is slow laterally; the player can adjust his toss somewhat and get more angle. There are many tour players today that make these adjustments, depending on the opponent and season, either subconsciously, or with the help of a coach.
Toss Placement
For a twist service, the player should place the toss toward 11 o'clock, over the left shoulder. For a disguised topspin service, the player should toss to 12 o'clock directly above the body. In both cases, the toss should be 1 to 1.5 feet forward, or inside the baseline. (This second serve toss will be less forward than the first serve toss, which should be 2 to 2.5 feet forward.) To clarify, this forward toss is initially in front of the body, but then the body coils under the ball and explodes upward as the weight transfers forward. So in the end, the body is relatively under the ball, even with a forward toss and contact around the front edge of the body.

The key is to first get the kick serve toss in front of the body. I cannot stress the importance of this point enough. I often tell my students to toss "toward the front shoulder" as a reminder to toss them forward into the court. A common mistake is for the player to toss straight upward above the baseline toward the back shoulder, or worse, behind the plane of the baseline. This will move the contact point too far back. It will limit pace and depth and is also more stressful on the shoulder joint, a factor that will actually increase the likelihood of injury.
Toss Mechanics
I see many students that have erratic tosses and the reason is almost always mechanical. Here are the technical checkpoints that I look for on the toss:
The wrist should be firm. The player should not flick the wrist. The toss motion should be executed from the shoulder joint. The ball should be held in the fingertips, with all fingers touching the ball, not near the palm. Some players toss with the palm or just with two or three fingers, which hurts control. Ideally the tossing arm should drop so that it is aligned with the left leg. The player should release the ball first, and then coil the body to 130 degrees or more. I do not recommend fully coiling during the toss (where the tossing arm is more than parallel to the baseline). Try to keep the tossing arm in line with the baseline or left leg. The fingers should create a star shape on release, similar to a flower blossoming. There should be little spin on the ball. High speed studies of top players show the ball coming out of the hand with virtually no spin. This is why I like to see minimal wrist action, because it translates into less spin on the ball. The tossing arm should extend up, the shoulder should touch the chin, and the hand should point more or less to the ball. This helps create a good shoulder tilt and promotes the correct upward racquet path, a prerequisite for spin generation.

Shoulder Tilt
The shoulder tilt is an important key to getting the racket on the upward swing path to create an arcing flight path of the ball. Often, players are told to hit up on the ball. But the line of the shoulders is critical in achieving this. Pushing the right shoulder down toward the ground and stretching the left arm up to the ball is what prepares the body to thrust upward in the next phase of the swing.
Another key point here is the left hip. It is very important that the left hip moves forward into the court. This hip action works in concert with the shoulder tilt and rear leg loading to create the optimum position to thrust upward into the toss. Players who do not thrust the hip forward or get enough shoulder tilt are often frustrated that they cannot get enough spin and arc on the serve. Their serves tend to have a low trajectory over the net.
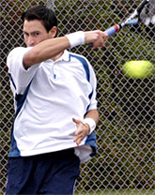
Power Position
The shoulder tilt is part of the trophy or power position that every player must achieve. The power position is critical to every serve, not just the kick, and is the foundation for achieving maximum racket speed. No matter how the student gets to the power position, he must get there! Some players bring the arms down-together up-together for rhythm, some delay the racket arm for more acceleration. Some take the racquet straight up, but regardless of the style of motion, every great serve gets to this trophy position.

Here are the checkpoints: The left shoulder is stretched upward with the chin tucked into the shoulder. The left hand is pointing towards the ball with the arm reaching upwards at an angle of 90 degrees or more. The eyes are locked on the ball--where they stay through contact. The racket arm is in the "L shape" or 90 degree throwing position.
Additionally, the elbow position is very important. The elbow should be as high as possible and held away from the ribs, ideally even with the line across the shoulders. Many players drop the elbow toward the ribs and this will ruin a kick serve. The elbow must be high and away from the body to promote the proper racket drop.
In addition, the elbow of the hitting arm should be stretched back behind the body. This position is sometimes overlooked, but it creates the optimal hitting position for a kick, and particularly a twist serve. The shoulder coil helps to place the elbow behind the body. If the elbow drifts to the right--as often happens if the hips and shoulder are too open--the serve will slice rather than kick or twist. Often, if a player cannot get the requisite twist, the root cause is the poor position of the elbow at the power position and during the upward triceps extension.
Deep Racquet Drop
Players should reach down so deep that the racquet drops below the waist level. When kids are told to backscratch, they dutifully follow that advice, but often they do not reach deep down enough, causing a reduction in racquet speed. In addition, they will often swing upward to the ball at the wrong angle, hitting the right or back edge of the ball more than the underside--the wrong racket path required to hit a kick serve. Oftentimes, a short backscratch results in a "hook" serve, causing a low trajectory slice rather than good arcing topspin. In my experience, the deep racquet drop phase of the kick serve is the most commonly misunderstood component. Indeed, mastering this deep backscratch was one of the most important changes in mastering my own kick serve delivery.

The deep racquet drop occurs quite quickly and is thus difficult to check with the naked eye (most likely why it is often overlooked). Biomechanical research calls this the acceleration phase and the cocking stage (1). Video can be a tremendous aid here, but with practice, a coach or player can also train himself to see details of the quick elbow drop with the naked eye. Lack of a good, deep backscratch is a very common stroke flaw that prevents full racket acceleration and maximum topspin generation.

Elbow Bend
The key to creating this deep racquet drop is to bend the elbow to the extreme. The player must have good flexibility in the arm and shoulder. If the player does not have good flexibility, the coach should manually stretch the arm to help the player feel the depth of the bend required--and then make sure the player gets on a focused stretching program. The length of the backscratch creates the runway for the "takeoff" of the racquet upward to the ball. The longer the runway, the more potential racket speed. This is a very important concept.
The further a player drops the racket down, the more "runway" on the way up to the ball, and thus the more racket speed and spin potential. Develop a better racquet drop to the extreme and watch the topspin revolutions per minute (RPM) and shape increase dramatically. From the power position, the elbow rises and points up to the sky during both the backscratch and triceps extension portions of the swing. The racket needs to accelerate up the runway and there should be no pause or hitch from the backscratch phase to contact. Players who have breakdowns in rhythm during this phase will lose pace and spin on the serve.
In biomechanics research this phase of the serve, when the racquet is dropped deeply behind the back, describes the point of maximal external rotation of the shoulder. If players are having trouble reaching deeply behind their back, they can stretch and develop better mobility in the shoulder joint and scapula to increase their range of motion during this movement.

Cervical and Thoracic Back Arch
As compared to the other two kick variations, the upper back arch is critical to imparting twist. If you are a coach or player who does not believe in back arch, you can develop a decent true topspin and topspin slice, but not a great twist action.

One additional benefit of upper back arch--for all kick serves, not just twist--is that it helps lower the racket even deeper into the drop, creating more runway and thus more potential racket speed. I also believe that the activation of the anterior abdominal muscles and the extension to flexion movement of the arched spine and surrounding paraspinal muscles add a small amount of extra energy to the motion, and research supports this concept (1). The back arch also helps to get the hand and racket further behind the body, which allows for a more extreme left-to-right swing path. This puts the racket in the right position for the upward swing and is critical in generating the twist sidespin.
Triceps Extension
The triceps extension is equally important for racquet speed. The arm must accelerate upward as fast as humanly possible, and this is especially true on the kick. I tell my players to "swing faster on the second serve than the first serve." The movement is from a deep backscratch to a full triceps extension. Imagine the movement as a 100 yard dash. The racket must sprint upward from start to finish as fast as possible.
If the player has a slow triceps snap, this technical movement should be practiced extensively until it is mastered. The elbow should remain pointed upward at the sky during the triceps extension. This is the axis point that allows good extension to take place. A stable elbow also promotes good alignment of the racket on its upward path to the ball.
Wrist and Hand Actions at Contact
Now it's time for the most difficult part in actually producing the spins: how the player addresses the ball with the wrist and hand. As the triceps extension reaches its apogee (high point), the wrist should loosen and violently snap up-and-out to accelerate the racket.
The wrist needs to remain sufficiently loose to accentuate this up-and-out snapping action. But this optimum looseness of the wrist is difficult to describe in words. What is "loose" for one player may not feel "loose" to another. The wrist can actually be too loose, which can make the movement imprecise and cause miss-hits. That said, most players tend to be too tight. Players should experiment until they are able to keep the wrist loose but still control the racket head.
In the next article, we'll look more closely at wrist and hand actions and define what we mean by true topspin, slice topspin, and other variations.
Stay tuned!